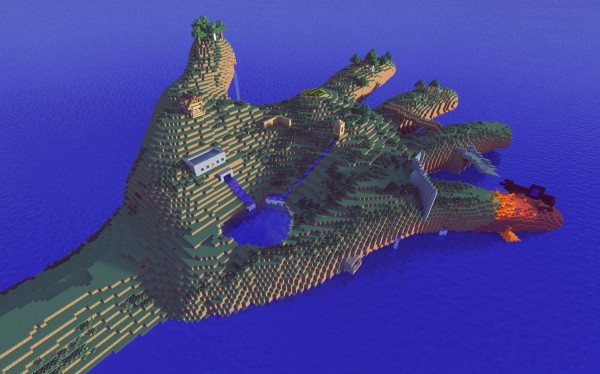
This stunning cross between a minecraft sculpture, render and island build was created by the undoubtedly talented minecrafter and redditor, Wheio. Here’s how he did it, in his own words:
- The raw terrain is created using WorldPainter. That isn’t grass; it’s two shades of stained, hardened clay.
- The large, customized trees are manually placed in using MCEdit. These trees are originally created byLetsLente and are available for download for use in your projects here.
- In ZBrush, a 3D model (the giant head) is sculpted or edited before being exported as an OBJ file.
- That OBJ is run through Binvox to convert it to a schematic file.
- The Schematic file is checked using ViewVox.
- The final Schematic file is imported and posed in the WorldPainter-made World using MCEdit. It is then changed from default stone into Quartz.
- For the first time, the world file is opened in vanilla Minecraft. Here the terrain is adjusted, with the small houses being built, the caves dug, and the waterfalls added. Smaller trees are bonemealed into existence along the ground, or hand built on the model. The model is also retrofitted to better fit it’s surroundings. In my case, I needed to almost completely destroy and rebuild the nose.
- The world is opened up using Chunky, excellent software built for rendering Minecraft worlds. The chunks that are visible from where the camera is are selected for rendering.
- In Chunky, the render is set up. Light-colored blocks (like Quartz and Sand) have trouble rendering in Chunky under the default setup, so the sun’s brightness, the photo gamma, and many other features are adjusted. The sun is also moved to where it best compliments the build. The sky is actually an image called a “Skymap” and there are many available online.
- The scene is rendered, a process which can be very time-consuming for the computer based on the complexity of the lighting. While the scene is being rendered, it might be a good idea to leave your computer and read a book. I suggest Ready Player One by Ernest Cline or The Fault in Our Stars by John Green. DFTBA!
- The image, now completely rendered, is imported into Photoshop. Here adjustments are made to the color of the photo. I find the David Nanchin actions to be helpful for this sort of thing, though I never run them full-strength. I also add in a water splash at the base of the water fall, and remove some pesky leaves that floated too far from their trees.
- The final image is exported from Photoshop and is ready to be seen by the lovely people of /r/Minecraft.
These step-by-step instructions as provided by the creator are incredibly useful for anyone who wants to learn how to sculpt minecraft creations, create custom terrain, make their own renders using Chunky and generally impress other people with minecraft pictures that say a million more words than a simple screenshot.